Uncle Sam's Hat
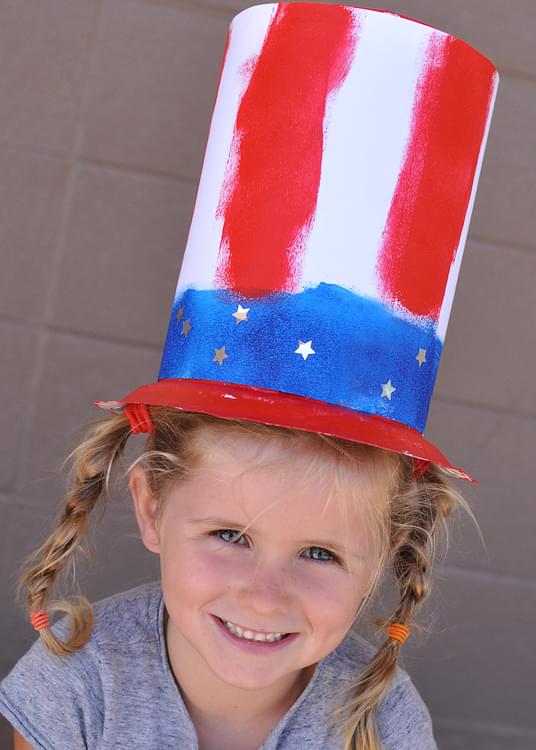
These cheerful hats are easier to make than they look, and are a great accessory for Independence Day on July 4th, for celebrating Uncle Sam's Birthday in September or to complement an American History Unit in preschool or elementary school. They would also make great centerpieces for a celebratory table.

Project Info
| Difficulty | Slightly challenging |
|---|---|
| Duration | 1 hour |
| Age | 3+ |
| Submitted by | |
| Share |
Materials
- 2 Paper Dinner Plates
- 2 Sheets of White Cardstock
- Glue
- Mini Paint Roller (x2)
- Red and Blue Paint (Acrylic is best)
- Silver Star Sequins
- Tape
Instructions
- Overlap the short sides of two pieces of card by about half an inch and tape together on both sides of the join.
- Dip one of the mini paint rollers in blue paint and roll along the long edge of the joined paper. You will need to instruct children that they can do this in sections, refreshing the paint on the roller as they go.
- Now dip the other paint roller in red paint. Paint lines of red paint at right angles to the blue line. The easiest way to do this is to start rolling at the opposite side of the paper and stop when you reach the blue line.
- Put dots of glue on the blue line and apply star sequins.
- Paint both paper plates red on their undersides
- Allow the paper and the plates to dry
- Roll the paper to make a cylinder with the blue, starry line on the bottom, and tape in place. You need the cylinder to be exactly the right diameter so that it fits just inside the rim of the two paper plates.
- Take the first paper plate. Cut a circle out from the center of the plate such that there is a hole in the middle, the edge of which is 1 inch from the rim of the plate.
- Now cut a slit from the edge of the hole you have just cut, to the edge of the rim of the plate. Now cut another slit, 0.25 inches along form the previous one. Continue doing this until you have cut slits all around the rim of the plate. This will form the rim of your hat.
- Take the second plate, and cut all the way round the outside of the plate, making the cut about half an inch form the edge of the rim. (In other words, you are making this plate smaller but cutting off half of the rim of the plate all the way round).
- Now cut slits from the edge of the cut plate to the edge of the rim - again making the cuts 0.25 inch apart all the way round the plate. This will form the top of your hat,
- You now need to attach the cylinder to the rim of the hat. To do this, take the rim, and fold all the 'tabs' that you created by cutting slits upwards. Now place a line of glue all around the base of the cylinder and place over the hat's rim - making sure that all of the tabs on the rim are inside the hat. Place your hand inside the cylinder and gently push each of the tabs against the edge of the cylinder to make contact with the glue.
- Now do the same for the top of the hat, this time folding the cut tabs downward and attaching to the top of the cylinder.
- Once dry, your hat is ready to wear.
Reviews
✶✶✶✶✶
Not yet reviewed
Useful supplies
- our picks from Amazon for this project:Related Books
- our picks from Amazon for this project:Related Projects
Project Themes
- Letters E-H: Letter F
- Letters U-X: Letter U
- Household Objects / Recycled Materials: Paper Plates
- National Holidays: 4th July Presidents Day
- By Age: For Elementary / Primary School For Preschoolers
- By Gender: For Boys and Girls
- Costumes, Clothing & Fashion: Hat
- Countries: Flags USA
- Famous People: Uncle Sam


