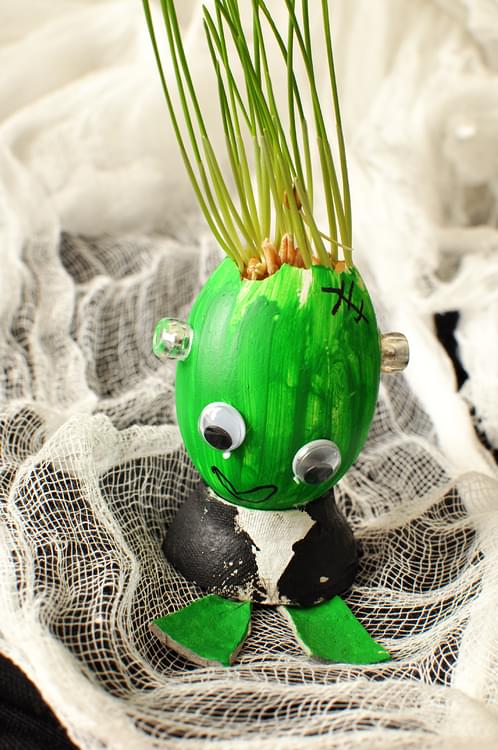
Halloween Monster Egg Heads
Let your imagination go wild creating these fun crazy hair monsters. Have your kids start them a couple of weeks before Halloween and they will be ready to sit alongside your jack-o-lanterns on your doorstep, or take pride of place on your Halloween Party Table.


Project Info
| Difficulty | Slightly challenging |
|---|---|
| Duration | 15-30 minutes |
| Age | 3+ |
| Submitted by | |
| Share |
Materials
- Cotton Balls
- Egg Carton
- Eggs
- Googly Eyes, Pipe Cleaners
- Paint (Acrylic or Tempura)
- Permanent Markers (e.g. Sharpies)
- Wheat Grass, Grass or Cress Seeds
Instructions
- Remove the top of your eggs. Do this by gently tapping the top of the egg on a work surface. Once cracked, carefully break open the shell so that the very top is exposed. Then use scissors to trim
- Wash and dry the egg
- Paint the egg in the color of your choice and allow to dry
- For each monster, cut out two egg cups from your egg carton.
- Cut one of the egg cups into quarters. Each quarter will be a foot for your monster. The portion that corresponded to the side of the egg cup will be the base of the foot. The triangle at right angles to this which corresponded to the base of the egg cup will be the surface that you use to attach the foot to the monster's body
- Cut out the base of the whole egg cup. This will form your monster's body.
- Paint the egg cups and 2 of the egg cup quarters ad allow to dry.
- Glue the feet (egg cup quarters) to the body (whole egg cup). Note: The egg cup will sit upside down - i.e the egg head will sit in the hole that you cut in what was the original base of the egg cup
- Place the egg head in the body that you have created. Decorate. Use googly eyes, pipe cleaners, pens, glitter and any other decorations you wish.
- Wet several cotton balls and place these inside the egg. Now sprinkle seeds on top of the cotton ball.
- Put your monster in the a sunny window, keep the cotton balls damp and wait for it's hair to grow.
Tips
- Wheat Grass seeds are an excellent choice for this projects - the seeds will sprout within a few days and will grow to several inches tall
- If you use Wheat Grass or Cress, you can trim and eat the hair!
- Do not overwater - you want to the cotton balls to stay damp - they should not be saturated
- Using Acrylic paint is preferable - then your paint won't run if you get the egg wet when watering the seeds.
Reviews
✶✶✶✶✶
Not yet reviewed
Useful supplies
- our picks from Amazon for this project:Related Books
- our picks from Amazon for this project:Related Projects
Project Themes
- Events and Other Celebrations: Halloween
- By Gender: For Boys
- Animals, Birds, Fish & Insects: Eggs
- Plants: Grass Seeds
- Prehistoric & Mythical Creatures: Monsters


