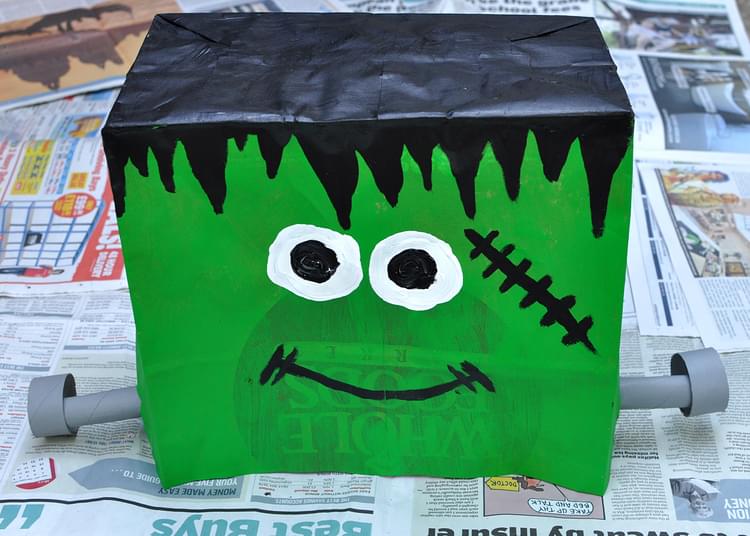
Frankenstein Monster Mask
These fun and not so scary Frankenstein Monster masks will provide much fun at Halloween, as a craft, a homemade costume or as a centerpiece on a Halloween table. Elementary age children should be able to complete most of this project on their own without much assistance.

Project Info
| Difficulty | Slightly challenging |
|---|---|
| Duration | 1 hour |
| Age | 5+ |
| Submitted by | |
| Share |
Materials
- 2 Toilet Rolls
- Green, Black, Gray paint
- Paper Bag, Handles Removed
- Tape
Instructions
- Cut the top off your paper bag so that when placed on your head it covers your head and the top of your shoulders only.
- Paint 3 sides of bag green (1 large and 2 small sides). These will be your monster's face.
- Paint the remaining side and the top of the bag black. Now paint triangles of black pointing down from the top of the bag into the green - This is your monster's hair
- Mark where your eyes are positioned when you place the bag over your head. Paint two large white circles centered on those marks. And then paint a black circle in the center of the white circles. Once the paint is dry, cut two small circles in the centre of the black circles so that you can see.
- Paint both toilet rolls.
- Cut one toilet roll in half lengthwise to form two rectangles. Using scissors make cuts into one of the short ends of each rectangle - each cut should be about 1 inch in length and about 0.25 inch apart. Roll both rectangles into a cylinder and secure at the uncut end with tape. You will now be able to fold down the slits formed by the cuts.
- Cut the other toilet roll in half across it's width to form 2 rings. Discard one half, you will not need this. Cut the other half in half again to form two narrower rings.
- Using tape secure the uncut end of one of the toilet roll cylinders to the inside of one of the toilet roll rings. Repeat for the other cylinder / ring. These form the "bolts" that will be sticking out from your monster's head.
- Figure out the position where you would like to place the bolts. Cut a cross in that position on both sides of the bag. Make the cross just big enough that you can push the toilet roll cylinder bolt through it (you will need to fold the slits in the cylinder back inwards before pushing through and then open once again so that the cut ends of the cylinder lay flush with the bag). You can now tape into place. See image.
Reviews
✶✶✶✶✶
Not yet reviewed
Useful supplies
- our picks from Amazon for this project:Related Books
- our picks from Amazon for this project:Related Projects
Project Themes
- Household Objects / Recycled Materials: Toilet Rolls
- Events and Other Celebrations: Halloween
- By Age: For Elementary / Primary School
- By Gender: For Boys
- Prehistoric & Mythical Creatures: Monsters
- Costumes, Clothing & Fashion: Mask


